To carry two sets of speakers (one port and the other starboard), I’m installing pipes of 3/4-inch galvanized steel conduit onto the roof rack, by means of these custom-built brackets …
Standard conduit clamps grip the brackets to the big honkin’ roof rack and the pipes slip through these to be screwed down …
If the xylophones are XyloVan’s skeleton and soul, then the sound system is its gonads.
To add some mystique to the aluminum’s natural resonance, we’re hooking up a cheap Pep Boys amplifier to the auxiliary power system, flying a quartet of cheap bookshelf speakers on outrigger booms (about which more later) and feeding them mike signals via a Behringer Xenyx digital-delay mixer. We haven’t quite figured out the microphones yet (well – more about that later).
But we have to install the components somewhere slightly out of the way yet still accessible so I can futz and troubleshoot from one location if anything goes south with the sound or lighting …
After weeks (okay, months) of building instruments, doing bodywork, making mallets and generally getting XyloVan into shape, it’s finally time to give it a pulse. How? Auxiliary big-ass battery.
The battery’s going to have to power the amplification system and the lights while we’re out roving the playa – or more importantly while we’re parked and people are playing for hours on end.
First thing you need is a really, really, really long battery cable. There’s no room for this huge deep-cycle marine battery in the engine compartment or anywhere near it.
The longest battery jumper cables made are only 20 feet, so I have to splice a couple of them together and somehow route them from the main battery in the engine bay, down beneath the truck, around the engine mount and driveshaft and exhaust pipes – and rearward to a place somewhere under the second row of bench seats because that’s where the auxiliary battery will be. And that means weather- and abrasion-proofing the cables – and that means cutting up some old inner tubes to serve as conduit and insulation …
So once we decided on the quasi-military paint job. we needed to finish it off with something. I designed this stylized X that might or might not be ripped off from the universal symbol for radiation. The first one came out pretty well, but will need some touchup. Just don’t look too closely …
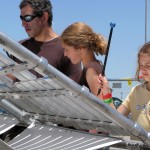
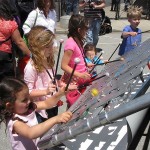
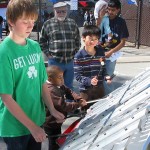
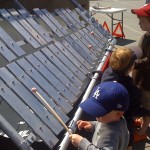
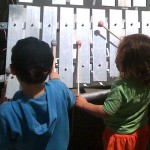
You toddled up and whacked away with sticks, silly grins on your 2-year-old faces. You strode up as if approaching the concert vibraphone you played in band, delicately picking out notes to tunes you haven’t played in 20 years. You hammered and drummed, pulling rhythmic tribal fugues out of the raw metal. You wheeled your disabled son up to Keyboard 1, watched his face light up, helped him hold a mallet and tap out a tune.
You played, in every sense of the word.
Thanks so much to all the folks at Maker Faire who enjoyed the van. You really touched us and showed us more joy than you can imagine.
We wanted to give a huge shout-out here to all the good people who helped us bring this project together:
To Robbie for wrenching and sweating par excellence to restore the damaged door, and for all the cheerful banter on the rainiest, slimiest junkyard crawl ever.
To Brian for acoustic advice, hardware assistance and spiritual support in the “man, that’s a wacky idea, but it should be cool when it’s done” vein.
To Steve and Beth for helping us mount the xylophones (man, was that just last week?)
To Rogan for engineering advice on mounting the keyboards, and to him, his lovely wife Susan and son, Asa for crewing our Maker Faire demo. We had an awesome weekend with you, and thanks to you freeing us up to see the other great creations there.
And finally, to my ever-patient, enthusiastic and non-stop gung-ho wife, Kristina, for helping to make all of this happen. Can’t wait to travel to Topanga Days Parade, Burning Man and all places in between where people love making sound.
If you enjoyed the van, drop a comment below – if you have photos or more/better video, add some links!
There’s still the auxiliary battery, the amplifier, the mixer, the speaker system, two resonators, the interior headliner needs replacing, the sun canopies haven’t been sewn, and the whole thing has to be wired and lit for the playa.
But when you bang on the thing it rings.And that’s what we set out to do in time for Maker Faire …
We are now – but for a wee bit of bungie-ing – ready for the long trek to Maker Faire.
I spent much of the evening getting Keyboards 2 and 3 (right) properly aligned against the side of the van.
I had to measure and cut support stanchions from 2-inch recycled aluminum tubing (thanks again, IMS), and then mount bottom brackets onto the van. This involves drilling holes in the body and attaching the SpeedRail support brackets to it with an ungodly number of pan washers and other hardware so they won’t tear through the metal with all the weight and stress …
Here’s video (videos lost when we quit Facebook) of @alienrobot and me mounting Keyboard 2 which is the lower-octave and rear-most of the two keyboards I built for the passenger side of the van:
And here’s what Keyboard 1 looked like as friend Steve Finkel and I mounted it on the driver’s side …